"FULLING...
Sometimes an art... sometimes a science... sometimes a flop... and always interesting." Lisa Cruse
"Fulling" in the context we will be using the term, is to knit or crochet an item in large proportions and then to shrink it in the washing machine. It is really that simple but there are many variables affecting the results so I hope these tips will help you to achieve your fulling goals. Please do not despair if your first attempt lands smack into the flop category. If your piece cannot be redeemed for its planned use, cut it up to use as embellishment on another! Once fulled, the fabric produced is solid and may be cut without the edges fraying.
You may choose to full your piece by hand, but that is a lot of work to tackle so I generally allow the washing machine to do the work for me and I concentrate on the blocking process.
Fulling depends on many variables and those that greatly affect results in the fulling process are the temperature of the water, the small amount of detergent added and the agitation of the washing machine. Timing around these three variables is under your command. Best results are with a top load washer as many front load washers will not allow you to interrupt the cycle and then you have no way to control the timing of the process.
1. Set your washer to a "SMALL" load setting.
2. Set the water temperature to "HOT".
3. Add very little detergent-- about a tablespoon.
Place your piece or pieces of similar colors into a zippered pillowcase protector or similar bag or pillowcase you can then tie with a string to close. A zippered pillowcase protector allows you easy access to check on the progress of your piece. It also helps to corral all that stray fiber that may otherwise clog your washer or drains.
Once the washer has reached the determined water level, place the bag with your piece(s) into the washer, forcing it down to wet the bag and allow the agitation to begin. Agitation may be enhanced by adding an old faded pair of blue jeans or tennis shoes or some such weighty article.
You may save money by fulling several pieces at one time or in succession while the water is still hot. Be sure to full lighter colors first and remove them from the washer before fulling the darks. This will ensure colors do not bleed into a piece and ruin your efforts. I use two or three bags to separate pieces with a couple of projects in each, as long as the colors are similar. Once I have fulled the lights I move on to the dark colors, sometimes using bags dedicated to that purpose to avoid stray fibers of different colors being permanently embedded in my pieces. (Think jet black with permanent bits of brightly colored lint scatered over all. Hmm.)
Allow the washer to agitate for a few minutes--perhaps five to eight minutes-- then stop the action and check your piece by unzipping the bag and checking the piece itself. Has it started to shrink at all? Has the yarn begun to look fuzzy? If not, zip it up and again allow the piece to agitate a few minutes before checking once more.
During this process you will find it necessary to turn the dial setting the timer on the cycle back to allow more minutes. I repeatedly set the timer on my machine back to the 18 minute mark so that my washer does not go into a spin cycle and drain off the hot water before I am finished using it. Meanwhile, I set the kitchen timer for short intervals to remind me to check on the piece.
Repeat the agitate-and-check process as often as necessary until you begin to notice a change in the texture and size of the piece. At that point it is crucial that the piece be checked carefully and more often at shorter intervals.
USE CAUTION once the piece begins to shrink as it will sometimes rapidly reduce in size once it begins to change. Remember that once a piece has been fulled (shrunk), it may NEVER be stretched out again!
Also note that I do not allow my pieces to go through a spin cycle as is suggested by some. I feel that would be taking chances with the piece and the result may be permanent creases or a mishapen identity.
When fulling hats for myself, it is easy to judge the appropriate size and to know when to stop fulling. I just squeeze out excess water and try the piece on for size. If your model is not handy for size reference, knowing measurements can help and I prepare a mold in advance to try the hat over the mold. (See "Shaping and Blocking", right.)
When you have reached the proper size in the fulling process, squeeze the piece to remove excess water and give it a quick rinse under cool running water. While squeezing, try not to permanently crease any folds into the piece by twisting or wringing.
Squeeze again to remove the cool water, then wrap the piece in a towel and squeeze once more and you are ready for shaping and blocking. Circulating air helps to dry the piece, however, placing the piece directly over a heating vent may cause distortion throughout the drying process.
| Mistakes happen.
Avoid common mistakes in fulling by first reading this and other articles by experienced fiber artists. Please remember fulling is always an experiment and you will sometimes find a flop in your washer! Do what you can to rectify the piece and if all else fails, you may use the resuting fabric as embellishment on another project.
For best results, use 100% wool which has not been made washable Percentages can vary and still produce satisfactory results but 100% wool will full for you. Washable wools, synthetics and some combined fibers may not full at all. Experimentation can be fun but also may produce disasters and be costly in the long run. Using products you know are reliable will ease your mind.
Found wool, at thrift shops, tag sales, Great Aunt Gertie's attic, may be excellent for fulling and you may try a swatch of your knitted fabric first to see how it will perform. It is possible to test a wool by wetting it (um, spit?) and vigorously rubbing it between your palms to see if the fiber fulls readily. Old yarn may have been dyed with products that are not colorfast. This means that the minute you toss your piece into the washer to full it, the dyes may run into the hot water and color everything they touch, including your skin.
Answering the telephone may also be a mistake while fulling. Any distraction may interrupt the timing involved with your piece so plan to work at a time when your attention is focused on the process. Enjoy the creative aspect and hope for the best. With some practice you'll be turning out style and loving it!
|
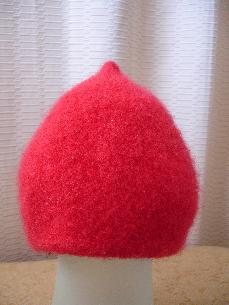 |
| Pixiedoodle, a Lisa Cruse original, is blocked over an inverted vase with a small inverted bowl rounding out the top. |
|
|
SHAPING and BLOCKING
One of the most important details in the construction process would be the shaping of your piece. Style is achievable with care and a good eye plus, perhaps, some tugging. Once your hat is fulled and excessive moisture removed, you basically have a raw hat blank with minimal shaping. It may not look like much at this point! Don't lose heart.
First, determine what shape the crown of your hat should be. Flat-topped? Rounded? A whimsical pointed shape? The knitting or crochet process is not the only determining factor for shaping.
Create a mold by finding items from your kitchen. (Yes, that is how I shape my hats-- nothing fancy here.)
First find a large can, flour cannister, vase, or other item that measures the same as the head size of the intended recipient of the piece. Heads vary greatly in size and age has not much to do with it. Children sometimes have larger heads than many adults so it is best to have a measurement with which to work. If your cannister, or other, is not quite large enough, sometimes cardboard or a towel may be fastened around the outside of the mold. If it is not tall enough, it may be elevated by setting it squarely over another object of weight on a countertop or table.
For the top of the mold, find another item of the appropriate size and shape for your vision of your piece.
For the VIVIAN mad-hatter style, I use a dessert plate, right side up, and large enough to slightly stretch the top of the fulled piece. The plate will slide up into the top of the hat and stretch it flat. Line up the edge of the plate with the purled turning rows where the rise / side of the hat meets the crown. The sides of the hat draw in slightly to fit the head size of the recipient.
A flat-topped hat with straight sides would do well on a flat-topped can of the proper size.
To create a rounded top, use an inverted bowl on the top of your cannister / base.
For a pointed top, an inverted funnel or small bottle of the proper height will lift the center of the hat if placed upright in the center of the mold. Try several options if necessary until the effect you desire is achieved. Cover the whole mold in plastic-- a plastic bag will do-- to protect the mold from moisture, if needed. Also protect the table top or countertop from moisture by placing the mold in a tray or over newspapers or towels and plastic in case of drips.
Place the hat over the mold. Stand back away from the hat to see where shaping is needed. Grasp and tug firmly to correct and shape the piece. Try avoiding pulling on the brim of the hat unless that is where the changes need to take place. Prop anything that does not stay in place on its own. Once you have achieved the proper shaping, let it be.
My house is usually cool and damp and it may take days for a piece to thoroughly dry. Throughout the drip dry process, I check the piece and correct any irregularities. Once dry, the piece would have to be wetted again in order to change its shape.
Clean your piece with a damp sponge by wiping the outer surface or brushing off dirt, lint, etc. If you find it necessary to wash the piece, soak it clean in cool water and very little mild baby shampoo or a wash specifically for wool (not Woolite). Then you MUST rinse, remove excessive moisture and BLOCK the piece as before to recover the original shape. Otherwise, to dry clean the piece is an option.
|
|